
Web push notifications, like anything else in life, has a bit of a science and art to it. But if you want to get the big numbers and cash in on your website the proper way, we are about to show you how you can turn those beloved users into subscribers.
The bottom line is this: you only have the one chance to make users become subscribers.
This being the case, most people simply go at it blindly or take the road most traveled. The default. If you use the default methods, you will get the default results.
But, of course, it does not have to be this way. There is a better way, better ways, in fact, to do things.
In this article we will demonstrate to you how you can use the opt-in to your advantage and how to make other web push notification users envious of your conversion rates. More subscribers means more visitors and more visitors means more opportunities.
Since we have revealed to you that you only have one chance to get the users turn into subscribers, we will show you the way in which you can work around that fact and even let them go through a kind of screening process that will allow you to save that precious chance for when they are ready.
It’s All About the Opt-Ins
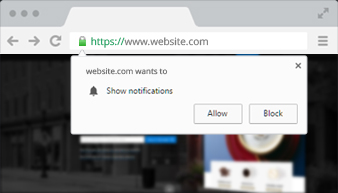
What percentage of users do you think click on “allow” once they see the opt-in screen? If you are thinking of a large number, you would be incorrect.
As little as 40% of the users click on “allow” when prompted for their permission to be sent web push notifications. But why?
Like we mentioned above, it all has to do with the fact that most people use the default. Once users see the web push notification request, chances are, their mind will turn a blind eye and not want to be bothered by yet another stream of notifications. That is, unless you stand out from the crowd.
Don’t Be Typical
Since users are used to seeing push notification requests by now, you would be wise to think that you have very little room to maneuver in. So, whatever we do have to work with, will have to make do.
Why People Click On “Allow”
The user experience is everything for the user. If they are feeling good, bad, annoyed, sad or whatever other emotion they could possibly experience, it really is not important, they don’t want you to come around and make them feel worse.
Therefore, we must be smart about the way that we ask users to become subscribers. Again, don’t be the default because the user’s default is likely a “no”.
You’re Going Too Fast
We have mentioned in the past how users don’t really want to click on “allow” right away. That doesn’t mean that they will never want to click that, but it does mean that the most usual time at which they get the request, the beginning, is not exactly optimal.
If you immediately ask the user for their opt-in, it would be like you kneeling before somebody you asked out on a date on the first day. It’s way too fast and the other party does not have nearly enough information about the kind of web push notification that they will be getting.
The Remedy: A Pre-Permission Screen
We have made it perfectly clear that you don’t get a lot of wiggle room when asking the user for their permission to get web push notifications. Well, that does not necessarily need to be true for you.
What is commonly known as a pre-permission screen, basically a request to send the user something or give them access to something exclusive that the rest of your visitors don’t get or a way to say “not right now, thanks” will be your best bet.
Pre-permission screens pretty much blow everything else out of the water as far as results are concerned.
The problem is that the request for the permission of the users is very clear-cut. Either you want it at that moment and you get it forever or you get a rejection, which is also permanent.
Start with Why
Look, we all like to know what we are getting ourselves into. If you ask the user to let you send web push notifications right away, they are probably going to say no. And who could blame them? You have not explained why it would be a good idea to let them!
If you use a pre-permission screen to let them know what they are getting in exchange for letting you send them the web push notifications to begin with.
When They Say No, They Mean It
The biggest hurdle to overcome when it comes to the all-important moment of getting the click on “allow” is that, if they choose to click on “deny” instead, they don’t get a second chance to change their minds. Browsers simply won’t show them the request again and they are unlikely to change their mind if they don’t even remember that they have the option to get sent web push notifications.
Pre-Permission Screen to The Rescue
Since you don’t want to waste the one chance that you get to have the users click on “allow”, the best option forward is to let them say no, but make it a different “no”.
What do we mean? Simple, include in your pre-permission screen the option for the user to say “no, thank you, not right now”. Once they click such a button, the users would be left to their own devices and the request screen would not be shown, therefore saving the chance to let them click on “allow” later on.
There are several ways to deliver the pre-permission screen to the user. The most effective ones include pop-overs, sliders, banners and also dedicated pages in which the user can actually see the list of benefits that they will get or claim whatever it is you’re offering as a means to entice them.
Timing Is Still King
Even if you are using a pre-permission screen as a way to circumvent the usual pouring of rejections that most websites get when they ask for users’ permission, you still have to be mindful about where you put the pre-permission screens.
Here is a small list of suggestions that you can use for best results:
- Put them on the About Us page
- Put them before the users leave
- When they look at specific articles
- On pages that only users who are interested in your brand visit
Let It All Flow
Once you have the pre-permission screen set up and ready to go, you should keep in mind that it should work in a way similar to this:
- The user clicks on the “yes” button.
- They are sent to a link in which they can claim the prize they are getting or get more information as you promised.
- They then get prompted for their permission to get web push notifications.
- They click “allow”
- You’re done
Or
- The user clicks on the “not right now” button.
- The pop-over, banner or whatever tool you’re using disappears.
- Since you don’t show them the prompt, they still can change their minds later.
- You still have the chance to have them click on “allow” in the future.
- You’re done for now.
Too Long; Didn’t Read:
- In order for the users to click “allow” in droves, there must be a reason why.
- You can ethically bribe the users with downloads, access or content.
- The default prompt screen is very limited in the amount of information that it gives to the user
- You only get one shot to let the users click on “allow”
- If you use a pre-permission screen, the users can click on “no” but it will be a temporary “no” which they can rectify later on, unlike what you get when you use the default.
- A well-designed pre-permission screen will let the users know exactly why they should be a subscriber of yours and why you think it would be in their best interest to do so.
- If you use a pre-permission screen, your numbers will change drastically compared to what the rest of the industry gets who only uses the default options.